A companion document to Passive Network Tap
Version 1.0, 20060213
To get the best performance out of a “cheap” Passive Network Tap (PNT), there are two determining factors:
How well is it wired? Shorter wire runs inside the box and clean layout help reduce radio frequency interference.
The nature of the NIC is everything! Remember, you're dealing with 4 network interface cards for every connection; Host “A”, the two NIC's on the sensor, and Host “B”. Some combinations work great. Some are disastrous.
My first experience with a cheap PNT was several years ago. I saw the fine paper by Michael Peters on Sun's BigAdmin site 1, went to Radio Shack and got the parts, then assembled and started using it. My initial results were great, with virtually no errors, so I pretty much took it for granted.
After changing jobs, I decided to write a paper on building and using a PNT because they are so useful. Then, the problems began. The error rate was incredibly high; 40% to 50%! Why? Because I had gotten lucky with my initial experiences with the taps, then inadvertently discovered what NOT to do on subsequent attempts.
The difference between success and failure is simple – the NIC's themselves. And, in this paper I hope to do the following:
Provide guidance on NIC selection
Give performance and setup examples
Solicit tips and comments from YOU on your experiences
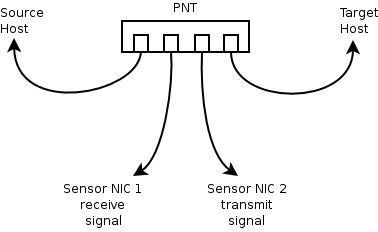
The PNT is inserted between a network source (router, switch, etc.) and the target (server, workstation, switch, etc.), allowing a sensor to tap into the receive traffic on one NIC, and the transmit traffic on the other. The two halves of the network conversation are then joined on the sensor into one flow for analysis.
For detailed instructions on “bonding” the traffic on the sensor, refer to Passive Network Tap
Granted, you don't have much control over the NIC on the upstream or downstream side of the tap (the HOST ports). The upstream network source is going to be a switch port, a router of some kind, or possibly a firewall/appliance. The downstream network target is going to be a similar network device or computer.
But, you do have control over the type and quality of the network interface cards in the sensor itself. And, using the wrong NIC's can degrade the network signal so badly that the target device will simply cease to function. Here are some criteria for NIC selection that I think are a good starting point.
Quality. Use the best quality, name brand NIC you can afford; such as Intel, 3com, etc.
Type. You will probably want to stick to 10/100 cards. Due to the handshaking involved with gigabit networking, I'm not sure it's possible to “tap” a gigabit connection. If you do use a 10/100/1000 card, just make sure through testing that it is “well behaved”.
I'm starting a list at the bottom of this document to identify known good combinations of network cards and devices. Please feel free to contribute your experiences by sending at email to me here: mark AT altsec.info (replacing the “ AT “ with the proper @ sign, of course).
The first time I used a home-built PNT, I placed it inline between an IPS router and the firewall. The router was a Yipes T1 and the firewall was a Dell Poweredge 1650 with IntelPro NIC's. The sensor was also a Dell 1650, but the sensor NIC was a 4-port Znyx ZX346Q, using two of the ports to bond the receive and transmit traffic. I don't have the packet data from that time period, but I do remember for sure that the setup had virtually no errors at all. Otherwise, I wouldn't have left it inline with the company's primary Internet connection for long.
My current sensor is a custom built slimline, micro-atx box running Debian 3.1x. The sensor NIC's are paired 3com 3C2000-T 10/100/1000 cards. The following case studies use that platform.
Study 1
|
Source Host |
TAP-A |
TAP-B |
Target Host |
|---|---|---|---|
|
Westel 6100 DSL router |
Sensor eth0 |
Sensor eth1 |
Snapgear 530 firewall |
|
Source |
Rx packets |
errors |
Tx packets |
errors |
Total packets |
errors |
|---|---|---|---|---|---|---|
|
firewall |
17441 |
257 |
13605 |
0 |
31046 |
257 |
|
sensor |
31061 |
0 |
12 |
0 |
31073 |
0 |
Above, you can see that the firewall received 17441 packets from the DSL router, but had 257 errors.
Assuming that the total received packets includes 257 retransmitted packets due to the errors, that amount should be subtracted from the total before trying to get a percentage. Therefore, the error rate on the connection is 1.49% ( 257 / (17441-257) ).
Now that I've tested that particular connection, I know that I can insert my sensor without serious degradation of the network, BUT with an error rate of 1.5% I am certainly not going to leave it there.
Study 2
|
Source Host |
TAP-A |
TAP-B |
Target Host |
|---|---|---|---|
|
Asus GigX 1024P switch |
Sensor eth0 |
Sensor eth1 |
aopen XC cube EZ18 |
The aopen cube workstation comes with onboard nVidia networking (nForce2) and works great with the default “forcedeth” drivers. I have two of the cubes; one running Debian “Sarge”, and the other running Windows 2000. This study is the Debian box.
|
Source |
Rx packets |
errors |
Tx packets |
errors |
Total packets |
errors |
|---|---|---|---|---|---|---|
|
workstation |
46672 |
0 |
39542 |
0 |
86214 |
0 |
|
sensor |
86354 |
0 |
18 |
0 |
86372 |
0 |
The test ran for a total of 10 hours, 25 minutes with no network degradation (meaning no network errors). The numbers are from the interface statistics; “netstat -i”.
Note: slight difference in total packets is due to time differences in the start of the test on each platform.
Study 3
This is the aopen cube running Windows 2000, connected to the same switch (2nd try).
|
Source |
Rx packets |
errors |
Tx packets |
errors |
Total packets |
errors |
|---|---|---|---|---|---|---|
|
workstation |
16928 |
0 |
15019 |
0 |
31947 |
0 |
|
sensor |
31948 |
0 |
0 |
0 |
31948 |
0 |
The first attempt at this study was unwisely conducted relying on interface statistics. Since one platform is Windows (grapefruit) and the other Linux (truffles), the comparison was useless; for everyone knows you can't compare grapefruit and truffles.
On the second attempt, Ethereal was installed on the Windows box in order to normalize the test. The capture files from the workstation and the sensor were adjusted to cover identical time spans due to the difference in capture start times.
The packet dump from both the workstation and sensor were identical with ONE exception; packet 566 on the sensor was a copy of packet 565, but with a mangled header.
Overall, I would have to consider the tap and sensor combination successful. One obviously mangled packet out of 31,947 is acceptable to me.
Connecting the tap
Regardless of the combination of network devices, when and how you connect the tap can mean the difference between success and failure. The following is the procedure I use:
The target host is connected to the upstream source, fully initialized and online. For example, the workstation to be tested is operational and plugged into its switch port.
The sensor is booted and running, but the NIC's are NOT plugged into the tap yet. I like to have the sensor's network fully initialized, with the NIC's bonded; ready to start tcpdump and/or snort as soon as the sensor is plugged in.
Quickly unplug the target host and insert the tap between it and the network source. NOTE: Use the same switch port the target host was originally connected to.
Verify that the target host is still online. Quickly unplug the tap if not. If possible, open a network status dialog on the target host and check for network errors.
If the network connection for the target host is not seriously degraded, plug the sensor NIC's into the tap.
Check the error rate for the target host again
If the network is not unacceptably degraded, start tcpdump and/or snort on the sensor and begin monitoring and capturing.
Keep a close eye on the quality of the network connection.
Sensor NIC's
No matter what brand and type of network interface card you try, make sure the sensor NIC's are a MATCHED PAIR. If one is an Intel Pro 10/100 card, both should be the same. And, by “sensor nic”, I mean the pair of cards that are bonded to recombine the network traffic from the tap, NOT the network interface card that connects the sensor platform to the network. As a matter of fact, it's a very secure idea to NOT connect the sensor itself to the network, AND if you do, harden the heck out of the system, firewall it to the Nth degree, and guard it with your life.
Crossover cables, tapping “host to host” connections
Zyxel gigabit NIC's (sensor)
Notebooks with onboard RTL8139 NIC's (host)
Notebooks with the TRENDnet TE100-PCBUSR pcmcia cards (host)
Routers
Westel 6200 DSL, bridged mode (1.5% error rate)
Switches
Asus GigX 1024P
Host NIC's
Apple iBook G4 (onboard NIC)
aopen nVidia nForce2 (onboard)
Intel Pro
Sensor NICS
3Com 3C2000-T
Intel Pro
Znyx ZX346Q
I have done this research for two reasons. First of all, I see a valid need for inexpensive tools in network security. My personal philosophy is, no matter how much money you have to spend on expensive appliances and software, you can always put more sensors in the field if they're cheap. And, my book says that more sensors = more chances to catch the bad guys.
Secondly, I believe wholeheartedly in the open source philosophy and in sharing my knowledge freely. I hope that if you find this information useful, you will share your findings with me. There are many ways in which this documentation can be improved, and I'm sure corrected as well. Please feel free to let me know of any mistakes I've made, or give your suggestions.
Email me: mark AT altsec.info.
Funny note: I had the properly formatted email address in my public resume on this webserver. Within days after putting my resume on the system, I started receiving phish attempts addressed to me here. Naturally, after that I replace all of the @ with AT. But, for the phishing and spam harvesters out there looking for email addresses, here's a good one: spam@uce.gov :)
The legal part: You accept all consequences and/or damages from the use of this information. Period! I have only described my own experiences with building and using passive network taps, and I have listed all the dangers that I know of. If you work for a stock exchange and manage to bring down your entire network trying to plug a network tap into the system during the middle of the trading day, oops! That's not my fault. With this information, as with any other, follow the best practices of the trade and test your tools for suitability in your environment.
Lastly, I'm always looking for interesting work. If you are willing to pay a reasonable rate for excellent quality consulting, let me know.
References:
Michael Peters - Construction and Use of a Passive Ethernet Tap
Mark Stingley - Passive Network Tap
Copyright © 2006 Mark Stingley